RELOOP READY


for VirtualDJ 8.5
Last Update : April 2021


SETUP


Connections


Connect the unit’s USB socket with a USB port of your computer using the provided cable. Connect a pair of amplified speakers or amplifier to the RCA Master Output at the right side panel and a pair of headphones to the right side panel of the Reloop Ready.

Put the left-side Source iOS/PC switcher to the PC position.

Drivers


Windows: Install the required Reloop ASIO Windows driver from https://www.reloop.com/reloop-ready
Mac: No driver is required to be installed.

VirtualDJ Setup


Download and install VirtualDJ from http://www.virtualdj.com/download/index.html (in case you have not done already)

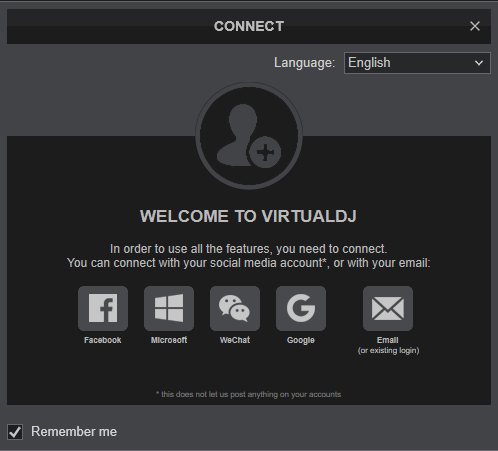
Once VirtualDJ is launched, a Connect Window will appear. Login with your virtualdj.com account’s credentials.

A Pro Infinity, a PLUS or a Pro Subscription License is required to use the Reloop Ready. Without any of the above Licenses, the controller will operate for 10 minutes each time you restart VirtualDJ.
http://www.virtualdj.com/buy/index.html


A detection window will appear next, asking to use or not the pre-defined audio setup with the built-in sound card of the Reloop Ready.

Select “Ready” and click OK


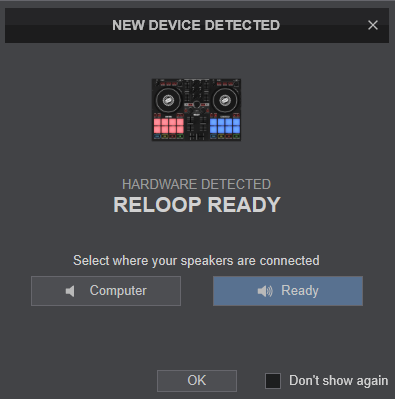
The unit is now ready to operate with VirtualDJ.


MIDI Operation


The unit should be visible in the MAPPING tab of Config and the “factory default” available/selected from the Mappings drop-down list.


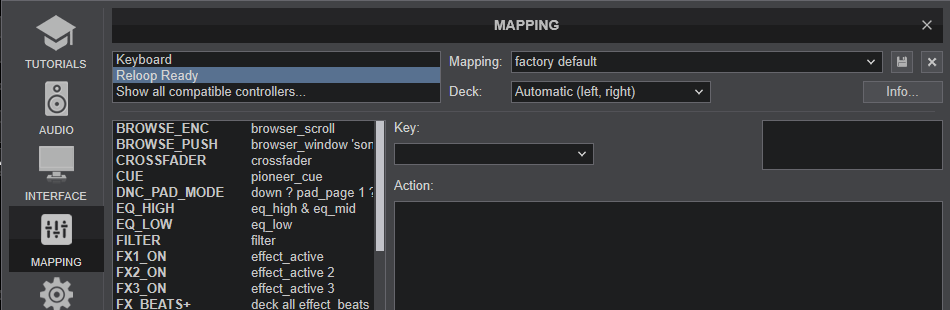
The factory default Mapping offers the functions described in this Manual, however those can be adjusted to your needs via VDJ Script actions.

Find more details at http://www.virtualdj.com/wiki/VDJ8script.html


AUDIO SETUP


The unit has a pre-defined Audio setup and a special button in the AUDIO tab of Config to provide that.


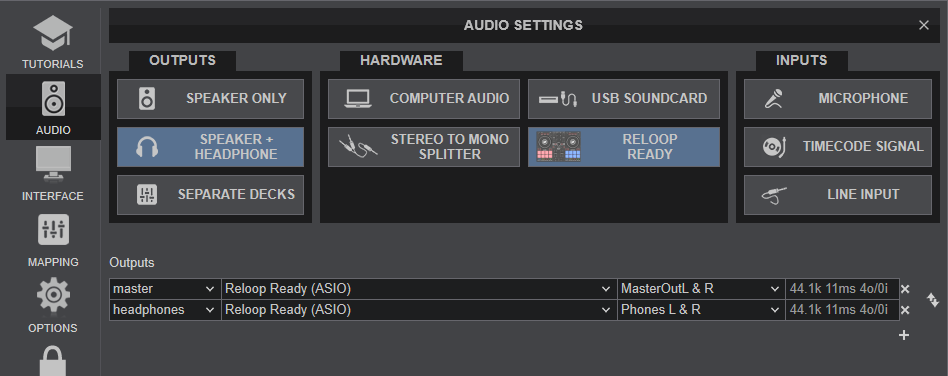
For further software settings please refer to the User Guide of VirtualDJ.
http://www.virtualdj.com/manuals/virtualdj8/index.html
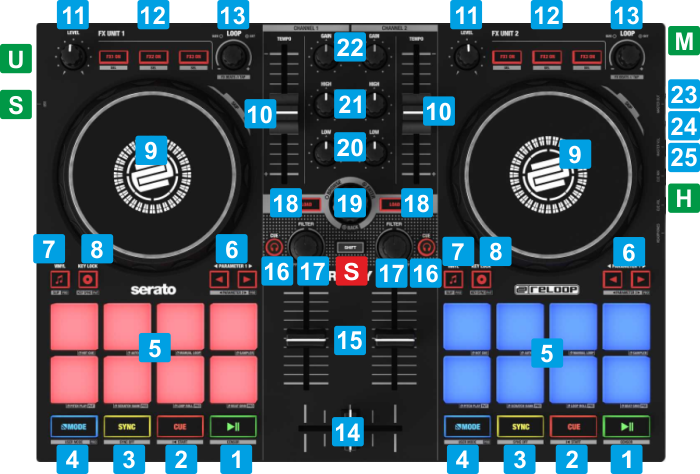
 

CONTROLS


CONNECTION

U USB
USB port to connect to a computer
S PC/IOS SOURCE
Set to PC position when using with VirtualDJ
M MASTER OUTPUT
Connect a pair of amplified speakers using a RCA cable or adapter
H HEADPHONES SOCKET
Connect your Headphones using a 1/8 " cable or adapter


KEY

ACTION

SHIFT (SECONDARY) ACTION

S SHIFT
Press this button down to access secondary actions as described in the SHIFT ACTION column
1 PLAY
Play/pause the loaded Track
Play/Stutter
2 CUE
Sets current position as Temporary Cue point. Preview track when paused while button is pressed
Jumps and stops to the Cue point when playing
Jump and stops at the beginning of the Track
3 SYNC
Match BPM and Beat Phase with the opposite deck
Smoothly reset Track's Tempo to its original value
4 MODE
Press and hold this button and then press one of the 8 Pads to select a mode for the Pads. See Pads
Set Pads to Touch FX mode. See Pads
5 PADS
Operation depends on the selected Pads mode. See Pads
6 PARAMETER
Adjust the 1st Parameter of the selected Pads mode
Adjust the 2nd Parameter (if available) of the selected Pads mode
7 VINYL
Enable/disable Vinyl mode. When enabled, use the upper part of the jogwheel to scratch and the outer part to nudge. When disabled, use both the upper and outer part of the jogwheel to nudge
Enable/disable Slip mode. When enabled, several actions such as Hotcues, Loops and scratch will act temporary and when done,Track will resume playback from the position it would have been if the action was never triggered
8 KEYLOCK
Enable/disable Keylock (Master Tempo). When enabled, changing the Tempo of the loaded Track will not alter its Key
Match the Key of the loaded Track to the Key value of the other Deck on first press, and reset its Key on 2nd press
9 JOG
Touch sensitive jogwheel for Scratch (when Vinyl mode is enabled) or Bend (when Vinyl mode is disabled)
Fast search (seek) Track
10 PITCH
Adjust track's tempo (BPM)
11 FX LEVEL
Adjust the 1st Parameter (usually Wet/Dry) of the selected Effects from all 3 FX Slots
Adjust the 2nd Parameter of the selected Effects from all 3 FX Slots
12 FX1 - FX3 ON
Enable/disable the selected Effect of FX Slot 1 to FX Slot 3.
Open the Effects drop-down list to select an Effect for FX Slot1 to FX Slot 3. Use the LOOP encoder [13] to scroll up/down and push the LOOP Encoder [13] to select and close the Effects list.
13 LOOP
Turn the encoder (anti)clockwise to half/double the size of the loop.
Push to enable/disable the loop.

When an Effect drop-down selection list is opened (using SHIFT+FX1-3 ON is used), use the encoder to scroll up/down through the Effects list. Push to select the Effect and close the list.
When loop is enable, turn the encoder to forward/backwards move the loop in time by 1 beat a step
14 CROSSFADER
Blends audio signals from left and right decks
15 VOLUME
Adjust Volume Output for Left and Right deck
Adjust Volume Output and and the same time, start Deck when moving from minimum position and stop Track when moving to the minimum position (Fader Start/Stop)
16 PFL
Sends pre-fader audio signal of the Left/Right Deck to the Headphones channel (for pre-listening)
17 FILTER
Apply the selected Color FX (by default FILTER) to the Left/Right Deck. When the knob is at center position (12 o'clock), no Color FX is applied.
18 LOAD
Load the selected Track from Browser to Left/Right Deck. Double-press to clone the Track from a Deck to the other Deck
Unload Track from Left/Right Deck
19 BROWSE
Scroll through Folders or Tracks
Push to toggle focus between Folders and Songs List.
Scroll fast (by +/- 10 Tracks per click.
Push to set focus to Folders list. When in Folders list, expand/collapse sub-folders
20 EQ LOW
Adjust the Low Equalizer frequency Band
21 EQ HIGH
Adjust the both Mid and High Equalizer frequency Band
22 GAIN
Adjust the pre-fader output level (Gain) of Left/Right deck
23 MASTER VOL
Adjust the Volume of the Master Output
24 CUE MIX
Blend in Headphones the signal from the Decks with PFL enabled and the Master Output.
25 CUE VOL
Adjust the Volume of the Headphones Output


PADS


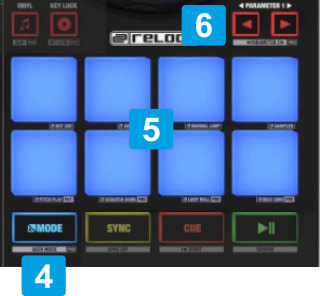
The Reloop Ready offers 8 main and 1 secondary Modes for the Pads.

To select one of the 8 main modes, hold down the MODE button [4] and then press one of the 8 Pads [5].
While the MODE button is pressed, the Pads section in default VirtualDJ GUI will display the available preset pages.

Use the PARAMETER buttons [6] to adjust the 1st Parameter of the selected Pads mode. Hold SHIFT down and then use the PARAMETER buttons [6] to adjust the 2nd Parameter of the selected Pads mode (if available)


Reloop Modes Page


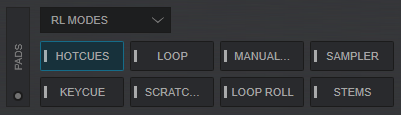
By default the 8 Main Pad modes are assigned to
Hotcues, Loop, Manual Loop, Sampler, KeyCue, ScratchBank, Loop Roll and Stems , but can be assigned to a different Page. See https://www.virtualdj.com/manuals/virtualdj/interface/decks/decksadvanced/pads.html#controller


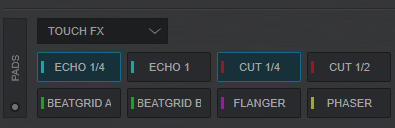
The secondary mode for Pads can be selected when holding SHIFT and pressing the MODE button. This mode has been assigned by default to the Touch FX Page

The Touch FX mode assigns Pads to a special Pads page (only available when the Reloop Ready is connected) and can apply pre-defined Effects to the Left/Right Decks. The Pads trigger the Effect temporary if pressed for more than 1 second, or toggle (on/off) if shortly pressed. The pre-defined Effects can be changed by editing the Touch FX Pads page.


Touch FX Pads Page


For further Technical features and specifications, visit

Reloop READY
Product's Page


Hardware Integration Department
2021 - ATOMIX PRODUCTIONS


Reproduction of this manual in full or in part without written permission from Atomix Productions is prohibited.